There is no decided method for storing basil. People swear by different methods, so we’ve provided two options, both of which have proven results.
Andy Lyons/Meredith
How to Store Basil In a Bouquet
As with many fresh herbs, it’s helpful to think of them as cut flowers. Any leafy herb with a soft stem, including basil, can be stored as you would a bouquet of flowers — in water. Here’s how:
Trim the stems, removing the last inch or so. Place basil in a jar filled with a few inches of water.
Loosely cover the tops of the basil with a plastic bag (unfortunately, your basil bouquet won’t make a beautiful centerpiece). A thin, produce bag works great for this.
Leave the basil bouquet out at room temperature, replacing the water every few days. Whatever you do, don’t refrigerate it. Exposed basil doesn’t do well in the cold. Once you’re ready to enjoy, wash and dry the leaves.
Fresh basil will last one to two weeks when stored this way.
How to Store Basil In a Plastic Bag
Another popular method for storing basil is the plastic bag method (it sounds far less exciting than “basil bouquet,” I know). If you prefer to keep your basil stored in the fridge like salad greens, this method protects it from the harsh elements.
Go ahead and remove the leaves from the stems. Wash and dry the leaves, using either a paper towel or a salad spinner.
Wrap the basil leaves in a dry paper towel and place inside a plastic bag. Seal and store for one to two weeks.
Carson Downing/Meredith
How to Preserve Basil
If you don’t plan to use your basil within one to two weeks, there are two methods for long term preservation: freezing and drying.
How to Freeze Basil
Because basil isn’t as hardy as herbs like rosemary or mint, it does best when frozen as a paste. Here’s how:
Rinse the herbs. Then blanch them by dipping them in a pot of boiling water for about 10 seconds (using tongs is the best way to do this). Then shock them by immediately plunging them into a bowl of ice water.
Dry with a paper towel or salad spinner. Remove the stems.
Add to a food processor along with just enough olive oil to create a sort of pesto-like paste. Freeze in an ice tray for individually-portioned servings.
To use frozen basil, add it to hot dishes straight from frozen, or thaw and drain before adding to cold dishes. Frozen basil will last for up to three months.
How to Dry Basil
You never know how long store-bought dried basil has been sitting on the shelf, so drying your own is going to be the fresher (and cheaper) option. Here’s how:
Wash and thoroughly dry the basil. Remove the stems.
Set your oven to 200 degrees F, or the lowest temperature. Add the basil to a parchment-lined baking sheet on the upper rack of the oven. Bake for two to four hours, or until dry and crumbly.
Allow the basil to cool completely, crumble, and store in an airtight container for up to a year.
As with all dried herbs, the ratio is about one teaspoon dried for one tablespoon fresh.
First, determine the cook time for the pasta you are using. See the notes below to determine the right time.
Combine pasta, water, and salt in the bowl of an Instant Pot. Give everything a stir. (See note below if cooking long, straight pasta like spaghetti, fettuccini, or linguini.)
Close and lock the lid.
Set the vent to “Sealing”.
Pressure cook on high for the time determined in Step #1.
Leave the pasta on natural release for exactly 5 minutes. (Note: Be very careful not to let it sit for any longer or the pasta will overcook.)
Use manual release to release any remaining pressure. (Note: Hot and starchy pasta water may spray out of the pressure valve when you release it. Cover the valve with a dish towel as it releases to keep this contained and minimize the mess.)
Open the lid and give the pasta a good stir, 20 to 30 times. (This will get rid of any dry spots that remained where the pasta was sticking out of the water during cooking. If adding sauce, stir it in at this point.)
Return the lid to the top of the pressure cooker (no need to lock it just set it on top) and leave the pasta for 5-10 minutes more. (Note: This step is the most important because the pasta will continue to absorb any remaining liquid and continue to cook just a bit in the residual heat of the machine. This is the key to pasta that is cooked, but not overcooked.)
Serve!
Notes
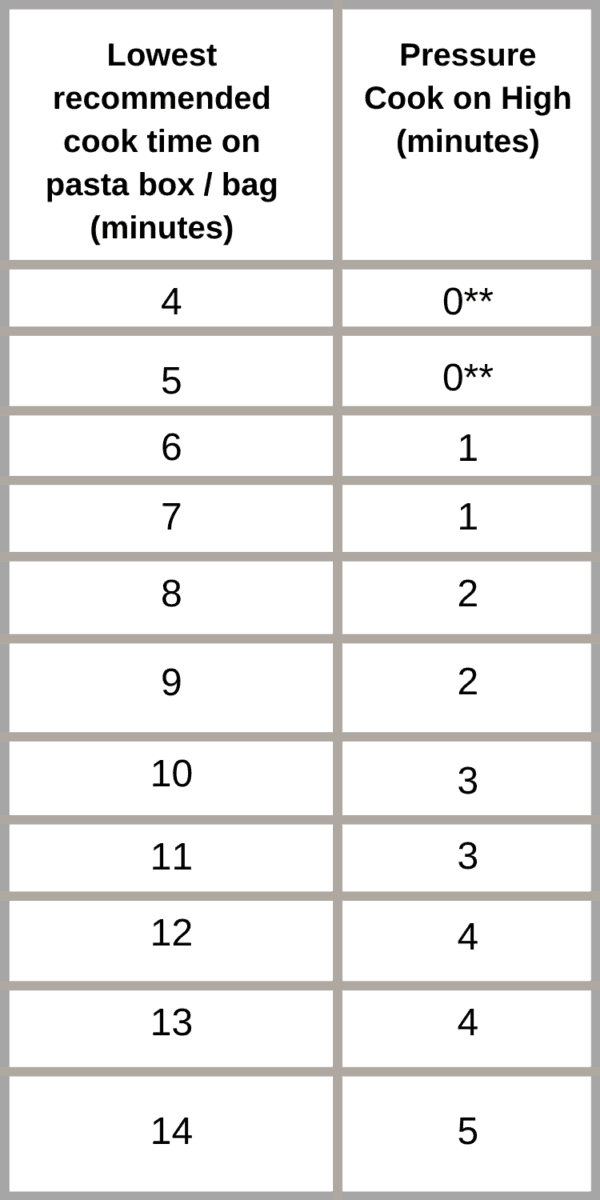
Find the lowest recommended cook time on the pasta box or bag. (If a range is given, use the lowest number in the range. So if the range is 9 to 11 minutes, use 10 minutes. If only one time is given and it’s odd, round down. So 7 minutes becomes 6.) Then use this chart to determine how long to pressure cook on high.
**0 is a real setting on the pressure cooker / instant pot. For small pasta shapes with a short recommended cook time, set the timer to zero minutes. The pressure cooker will fully pressurize but won’t hold for any amount of time.
Spaghetti, Fettuccini, or Linguini – Long straight pasta shapes like these (and angel hair, bucatini, etc.) need to be treated a bit differently than other pasta shapes.
Break the pasta strands in half before adding them to the Instant Pot so that they can easily be submerged in water.
Pour enough water into the Instant Pot to completely cover the pasta (note: there is no set amount, but only add water until every strand of pasta is submerged). Add salt.
Do not stir before cooking. (This will help prevent the pasta from sticking.)
Pressure cook pasta according to the time on the chart.
Leave pasta on natural release for 5 minutes and then release any remaining pressure.
After cooking, stir the pasta well to loosen any strands that are stuck together.
A request for Maid-Rite loose meat sandwich Recipe from Muscatine Maid-Rite Diners in Iowa – home of the original loose meat sandwich
Maid Rite sandwich first served in 1926 2 pounds ground beef, finely ground 2 cups chopped onion 4 teaspoons beef bouillon crystals 4 teaspoons prepared yellow mustard In a large skillet, brown ground beef over medium heat, about 5 minutes. Add onion and continue cooking for another 5 minutes. Sprinkle bouillon over meat mixture and enough water to barely cover meat. Reduce heat to low and simmer uncovered, until water has cooked away, about 30 minutes. Stir in mustard and serve hot over hamburger buns.
321 ribs are a foolproof way to get fall off the bone tender ribs. The 321 rib method is based on smoking ribs at a certain temperature for 3 hours, wrapping them with liquid for 2 hours, and saucing them for the final 1 hour.
PREP TIME: 15 mins
COOK TIME: 6 hrs
RESTING TIME: 15 mins
TOTAL TIME: 6 hrs 30 mins
SERVINGS: 2 people
CALORIES: 709kcal
What is the 321 Method for Ribs?
Smoking ribs using the 321 method is one of the most popular ways for a backyard enthusiast to cook ribs. They result in a truly delectable, fall-off-the-bone rib. While many “BBQ purists” will balk at the 321 method, there’s no denying that this meat is juicy, tender, and delicious. So, if you or your guests like meat that comes clean off the bone with every bite, definitely give the 321 rib method a try!
So what is the 321 method for ribs, exactly? It’s an easy way to cook pork ribs! In a nutshell, the 321 method for ribs is just what the name suggests:
3 hours in the smoker
Start by placing your ribs directly on the grill grates of the smoker for 3 hours to infuse the meat with that good, smoky flavor.
2 hours wrapped
Next up, wrap those smoky ribs in foil (usually with brown sugar, apple cider, butter, and other goodies) for 2 hours to add more flavor and keep that rib meat juicy.
1 hour with sauce
Last up, remove the meat from the wrapping and smother them in BBQ sauce. Finish them on the grill for 1 hour to set the sauce and ensure that the meat falls right off the bone.
321 Rib Method
This 321 rib method has gained a lot of popularity with home cooks in recent years because of the flawless results in churning out super tender ribs that fall off the bone every time.
While competition and traditional BBQ cooks will scoff at fall-off-the-bone ribs, the truth is that most people really like them that way. Judges for KCBS won’t give you a winning score, but they also won’t be hanging out in your backyard critiquing what you and your family are eating. So I say, cook what you like!
Sticky, sweet, tender, and oh-so-savory, 3 2 1 ribs are probably the most requested meal I receive for potlucks or family dinners. I tend to fall back on these ribs for gatherings because I know that they will deliver that tender, flavorful porky flavor every time. And sometimes consistency is super important!
One final tip: I highly recommend reading my post on How to Know When Pork Ribs are Done. This will help you determine when to remove the ribs from the smoker in addition to the times suggested.
I firmly believe that you should cook food the way you like it, and ribs are no different! Do you like your ribs saucy? Put some extra sauce on them (I like using my Everything BBQ Sauce). Do you like your ribs falling off the bone? Follow this 321 rib method! These are your ribs after all. Make them exactly how you like them!
Here’s how to cook your ribs using the 321 method:
PREHEAT.
Fire up the grill and preheat to 180-200 degrees F. Prepare the ribs for smoking while the grill preheats.
PREP THE RIBS.
Use a sharp knife to lift up the corner of the membrane on the back of the ribs. Using a paper towel, grip the membrane and pull firmly to fully remove the membrane. Trim any excess fat off the ribs as needed.
Next, season both sides of the ribs liberally with Sweet Rub or Rib Rub.
SMOKE FOR 3 HOURS.
Start with exposing the seasoned ribs to 3 hours of heavy smoke over low heat. I prefer fruit woods (apple or cherry) when smoking pork, but other hardwoods (hickory and alder) also work really well with ribs.
Place the seasoned ribs on the smoker and close the lid. Leave them to smoke for 3 hours (The ribs should be somewhere around an internal temperature of 165 degrees F at the end of these 3 hours).
WRAP FOR 2 HOURS.
After the initial 3-hour smoke, foil the ribs with a liquid of your choosing (I used apple cider, dark brown sugar, and butter) and cook at 225-250 degrees F for 2 more hours. After the braising period, Iook for great retraction of the meat from the bones. You want the bones to be exposed on the end at least 1/4 to 1/2 an inch.
Tear off a large piece of aluminum foil and place it on a large working surface.
Transfer the ribs to the foil bone side up so the bones don’t tear through the foil.
Sprinkle the ribs with the brown sugar, top with the butter cut into small pads, and then pour in the apple cider.
Tightly crimp the foil together to create an airtight seal.
Return the wrapped ribs to the grill and increase the temperature in the smoker to 225 degrees F. Let the ribs braise for 2 hours in the foil.
SAUCE AND SMOKE FOR 1 HOUR.
Lastly, baste the ribs in your favorite BBQ sauce (my Everything BBQ Sauce or Apple Jalapeno BBQ Sauce are delicious!) and return them to the grill for a final hour to finish the ribs and set the sauce.
Carefully remove the ribs from the grill and place them on a large working surface.
Open the foil package (be careful of hot steam) and use tongs to remove the ribs and place them back on the grill, bone side down.
Discard the foil and excess cooking liquid. Next, brush the ribs with Everything BBQ Sauce (or your favorite BBQ sauce).
Return the unwrapped, sauced ribs to the smoker. Close the lid, and continue smoking for an hour (or less!) or until the ribs reach around 200 degrees F and the sauce is sticky and set.
REST AND ENJOY.
Remove the ribs from the smoker and rest for 10-15 minutes. Slice into individual ribs and serve! I like to put extra sauce on the table for guests who enjoy their ribs extra saucy.
1 ½ pound ground chuck ½ cup chopped onion ½ cup soft bread crumbs (1 slice) ½ cup bottled dill pickle juice (or use the juice in a jar of dill pickles) 1 egg 1 ½ teaspoons salt ¼ teaspoon pepper ½ cup chopped dill pickle ½ cup catsup ¼ cup water 2 tablespoons sugar 1 teaspoon Worcestershire sauce
Mix meat lightly with onion, bread crumbs, dill pickle juice, egg, salt and pepper until well blended. Shape into a loaf in a shallow baking pan. (about 11x7x2)
Combine dill pickle, catsup, water, sugar and Worcestershire sauce; pour over loaf.
Bake in a moderate oven (350 degrees), basting twice with sauce in the pan, 40 minutes.
Continue baking, without basting, 35 minutes longer, or until richly glazed.
Zatarain’s Red Beans and Rice Mix is a premium blend of long-grain rice, dehydrated vegetables, and spices. Add the flavor of New Orleans to your menu. Provided in user-friendly packages to enhance back-of-house efficiencies, with superior barrier material and precise portion measurement—one pouch equals one full 2″ hotel pan.
Zatarain’s® Red Beans and Rice Mix brings Louisiana spirit to your guests:
• Zatarain’s Red Beans and Rice Mix features a premium blend of red beans, long grain rice, carefully dehydrated vegetables and superior spices. • Zatarain’s Red Beans and Rice Mix delivers the festive energy and fun flavors of authentic Louisiana-style cooking without the added labor of preparing from scratch. • Zatarain’s Red Beans and Rice Mix is kosher. • As the nation’s leading provider of New Orleans-style foods, Zatarain’s has been the authority on New Orleans flavor since 1889. • There are 8/30 oz. boxes per case. Each box features a superior barrier material and is designed to enhance back-of-house efficiencies, with one pouch yielding one full 2″ hotel pan. • Zatarain’s Red Beans and Rice Mix is great as a stand-alone side or as a base in rice bowls, warm salads and in breakfast skillets. • All-in-one Zatarain’s Red Beans and Rice Mix saves on prep and space without needing to store extra ingredients.
Menu Suggestions:
Zatarain’s® Red Beans and Rice Mix is a delicious side dish or accompaniment to: • Sliced smoked sausage or diced ham • Fried catfish strips • Andouille sausage • Combination plate with chicken, shrimp and catfish • Cajun pork chops with smoky green beans
Prep Instructions:
Bring the heritage and energy of New Orleans to your tables with easy-to-prepare Zatarain’s Red Beans and Rice Mix. Follow these kitchen-simple steps for each method.
Stove Top
To a large pot, add 12 cups of water, ¼ cup butter or margarine and contents of pouch. Stir thoroughly.
Bring mixture to a boil, stirring occasionally.
Stir, cover and reduce heat to low. Let simmer for 18 minutes (a low bubbling action should be visible).
When rice is cooked, remove from heat and let stand covered for 5 minutes.
Before serving, stir gently to fluff and mix.
Oven
In a full metal steam pan, add 12 cups of boiling water, ¼ cup butter or margarine and contents of pouch.
Stir thoroughly, and then cover tightly with lid or foil.
Place into a preheated 400°F oven and bake 35 minutes or until rice is cooked.
Stir occasionally. Sauce will be thin but will thicken as it stands.
When rice is cooked, remove from oven and let stand covered for 5 minutes.
Before serving, stir gently to fluff and mix.
Instapot (60 minutes from start to finish)
Add 1 Box of Zatarains’s Red Beans and Rice, 2 1/2 cups water, 2 Tablespoons butter or oil into the instant pot, and stir well.
Manual High pressure 12 minutes.
Natural Pressure Release
Stir & Serve
Leftover Rice
Cover and store in refrigerator. Reheat in saucepan with small amount of hot water to steam. For best results reheat in microwave oven.
Yields:
4 oz. = Approximately 52 Servings 8 oz. = Approximately 26 Servings
Storage:
To maintain the freshest flavor and color, Zatarain’s® Red Beans and Rice Mix should be stored in a cool, dry place away from exposure to heat, humidity, moisture, direct sunlight, and fluorescent light. Unopened Zatarain’s® Red Beans and Rice Mix packages are shelf stable and can be held for use for up to 730 days.
Where to Buy
Please select a package
ITEM CODE
PACKAGE SIZE
Z09565
8/30 OZ BOX
Ingredients
ENRICHED LONG GRAIN PARBOILED RICE (RICE, IRON, NIACIN, THIAMINE MONONITRATE, FOLIC ACID), RED BEANS, ENRICHED BLEACHED WHEAT FLOUR (WHEAT & MALT BARLEY FLOUR, NIACIN, IRON, THIAMINE MONONITRATE, RIBOFLAVIN, FOLIC ACID), SALT, ONION, MODIFIED CORN STARCH, SOY SAUCE (HYDROLYZED SOY PROTEIN, CORN SYRUP SOLIDS, SALT), RED AND GREEN BELL PEPPER, TORULA YEAST, YEAST EXTRACT, GARLIC, CARAMEL COLOR, SPICES (INCLUDING RED PEPPER), DEXTROSE, AND NATURAL & ARTIFICIAL FLAVOR.
Mix all together and bake at 375 degrees for about 45 minutes, or until done (toothpick test about center comes out clean). Let rest for 10 minutes. Serve
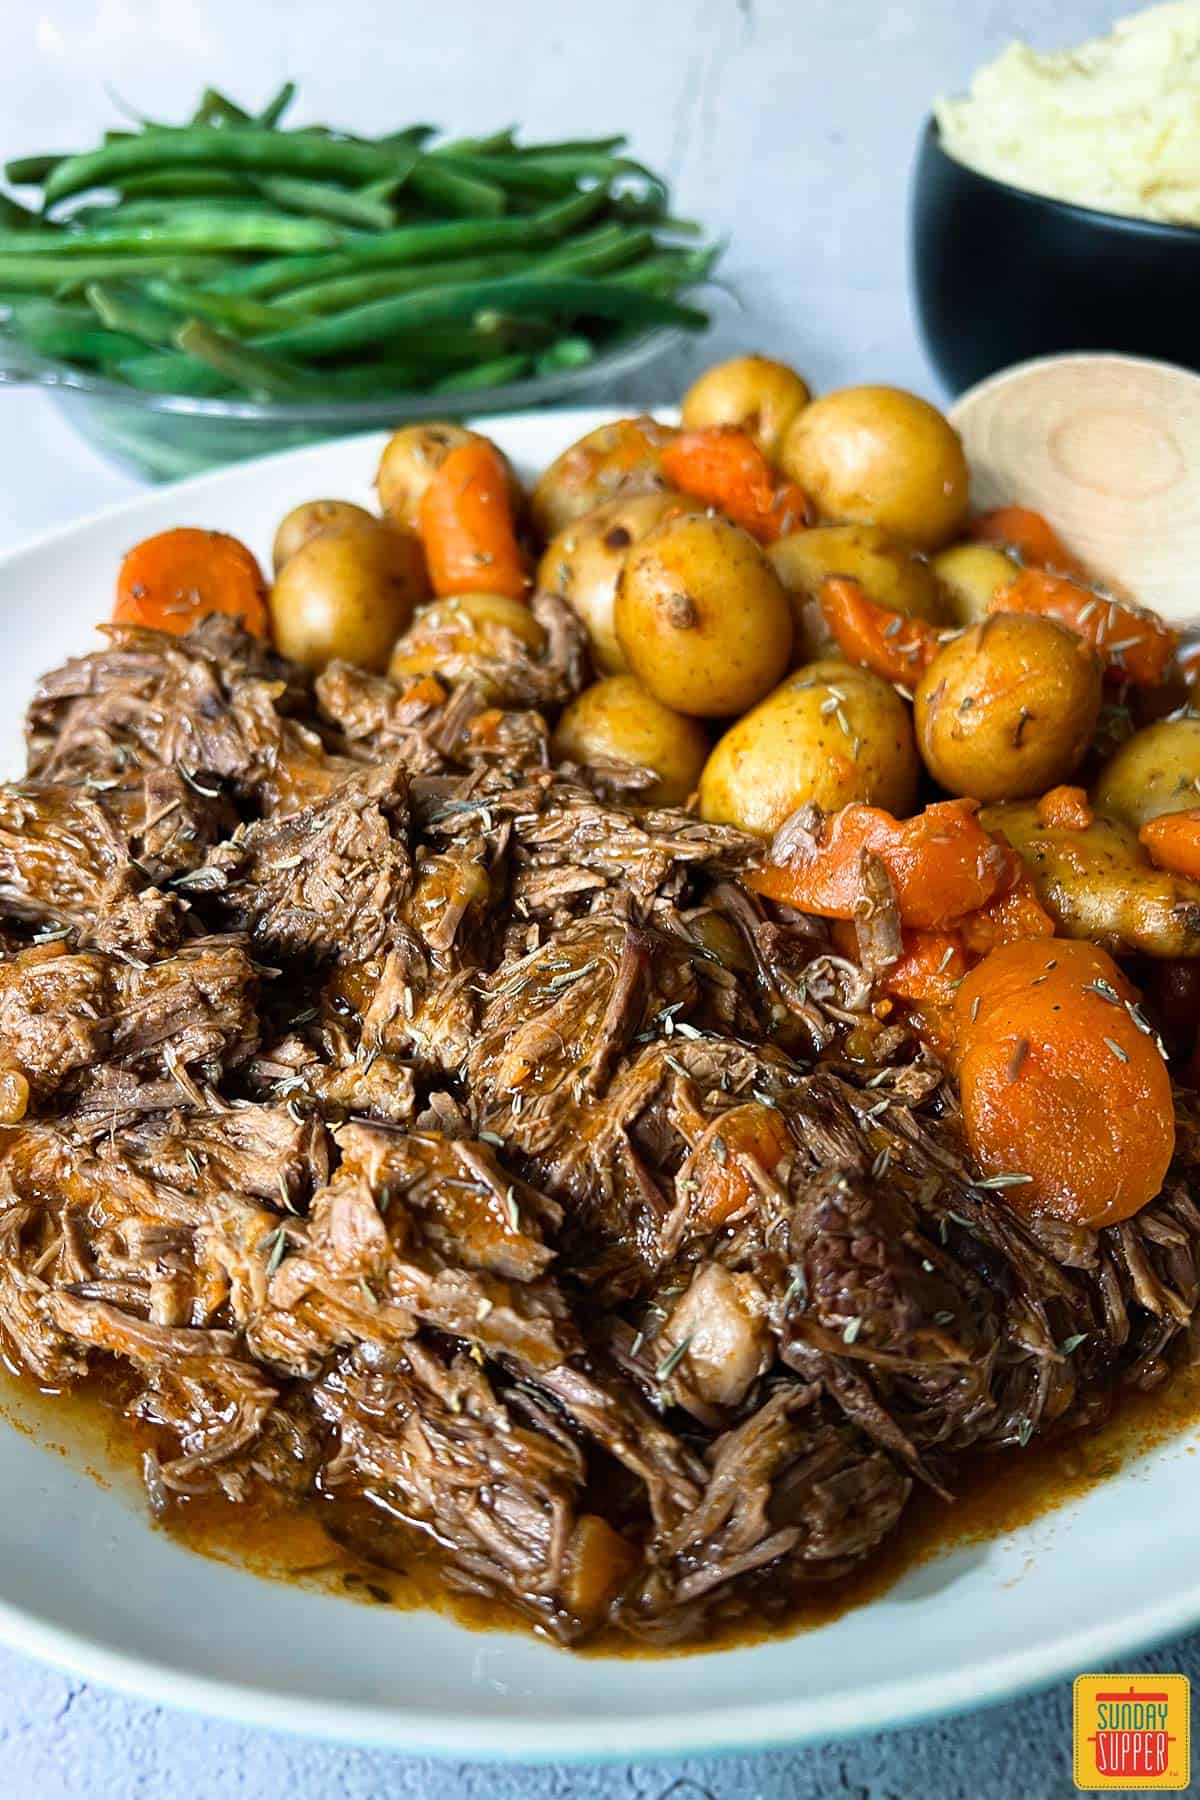
This Instant Pot Chuck Roast is a game-changer! Pressure cooking makes an incredibly tender and flavorful chuck roast recipe that is comfort food at its best. It’s easy to prepare and ready in just over an hour – so it’s perfect for Sunday dinner or even the holidays!
It’s quick and easy to make without compromising on flavor. Your average pot roast might take hours to cook in the oven or slow cooker – Instant Pot Pot Roast takes under 2 hours with minimal prep.
The ingredients are simple – you don’t need anything fancy to make this pot roast. It’s a classic pot roast recipe everyone will love, made easy.
It’s budget-friendly. Chuck roast is an inexpensive cut of beef, so it’s perfect for making an economical pot roast for a party or even the holidays.
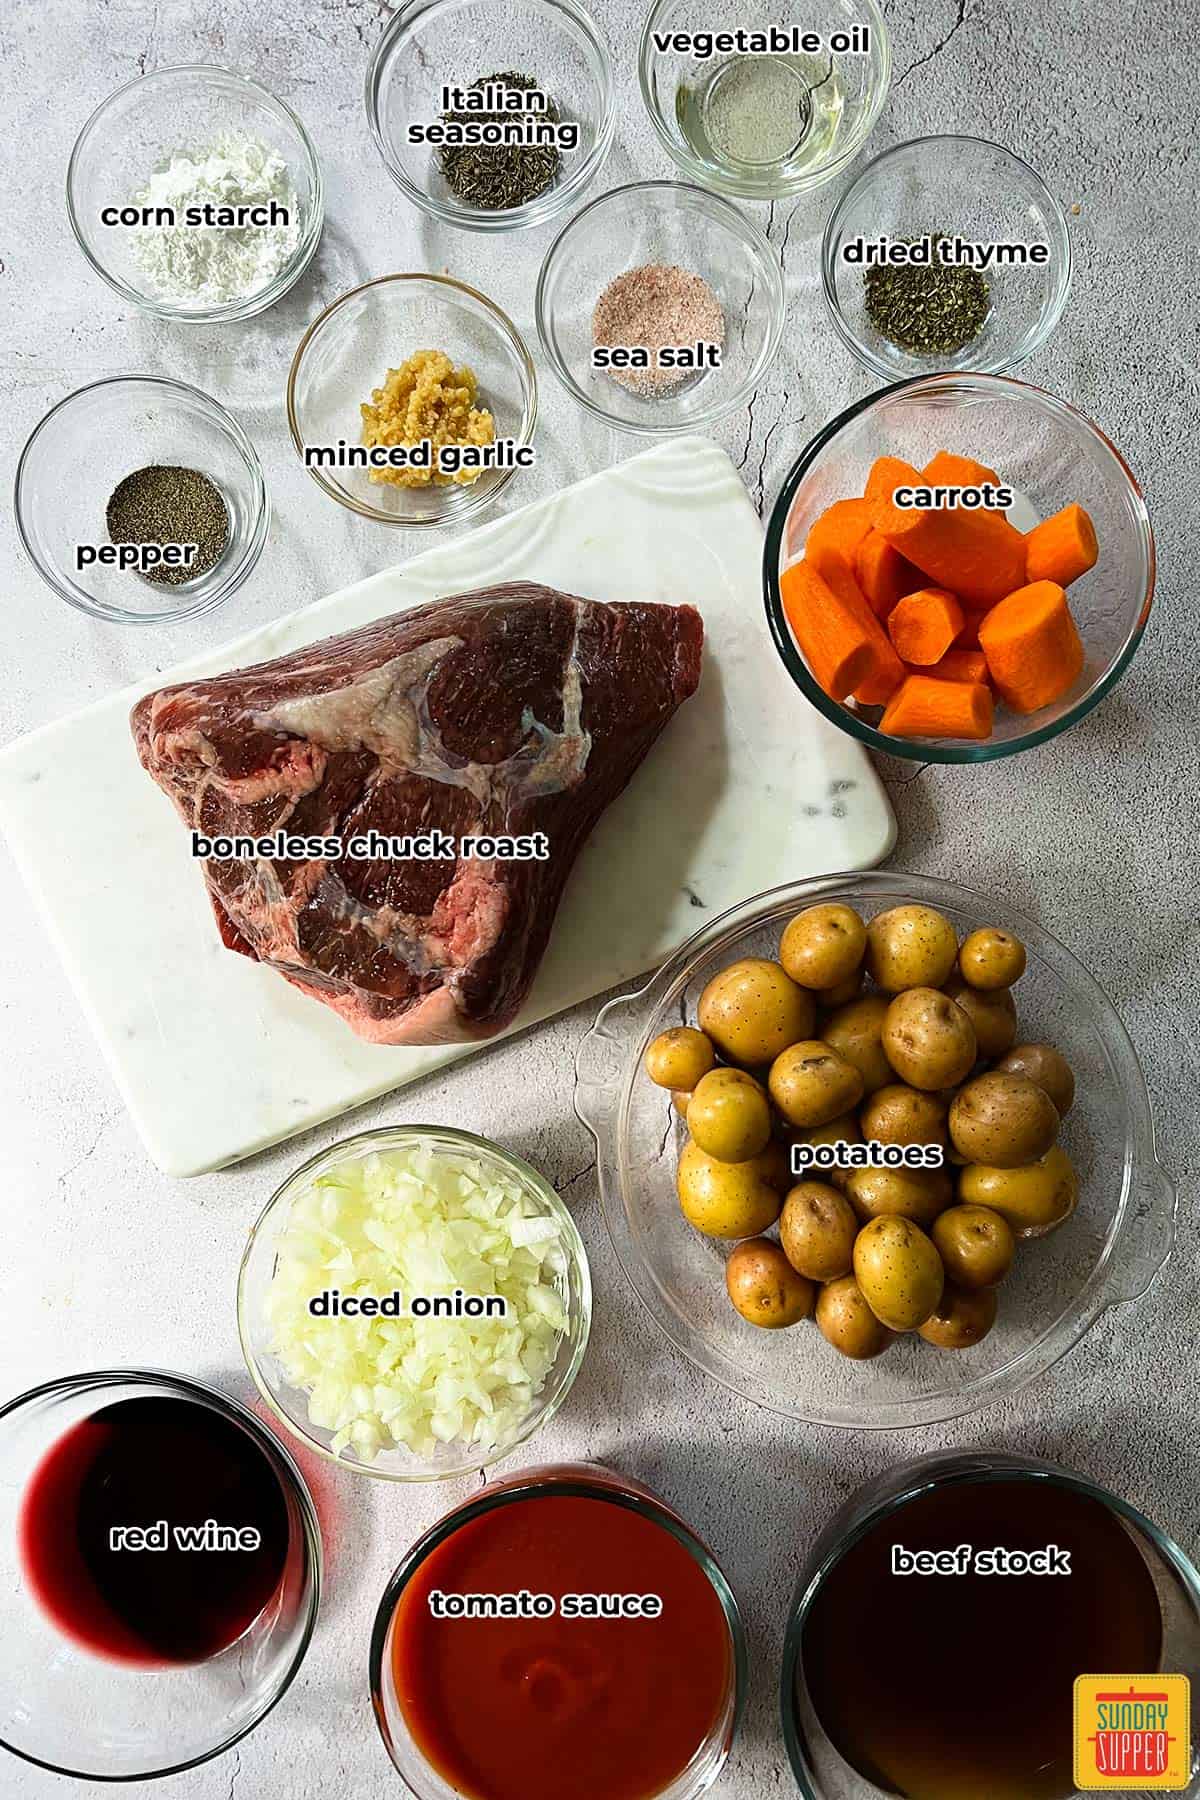
Instant Pot Beef Roast Ingredients
Boneless chuck roast, cut into halves
Vegetable oil
Garlic
Onion
Red wine
Beef broth
Tomato sauce
Kosher or sea salt
Pepper
Fresh thyme
Fresh rosemary
Corn starch
Chuck Roast Instant Pot Recipe
Generously season all sides of your roast with salt and pepper. Set Instant Pot onto sauté mode.
Once the Instant Pot is hot, add in half of your vegetable oil. Once the oil is hot, add your roast.
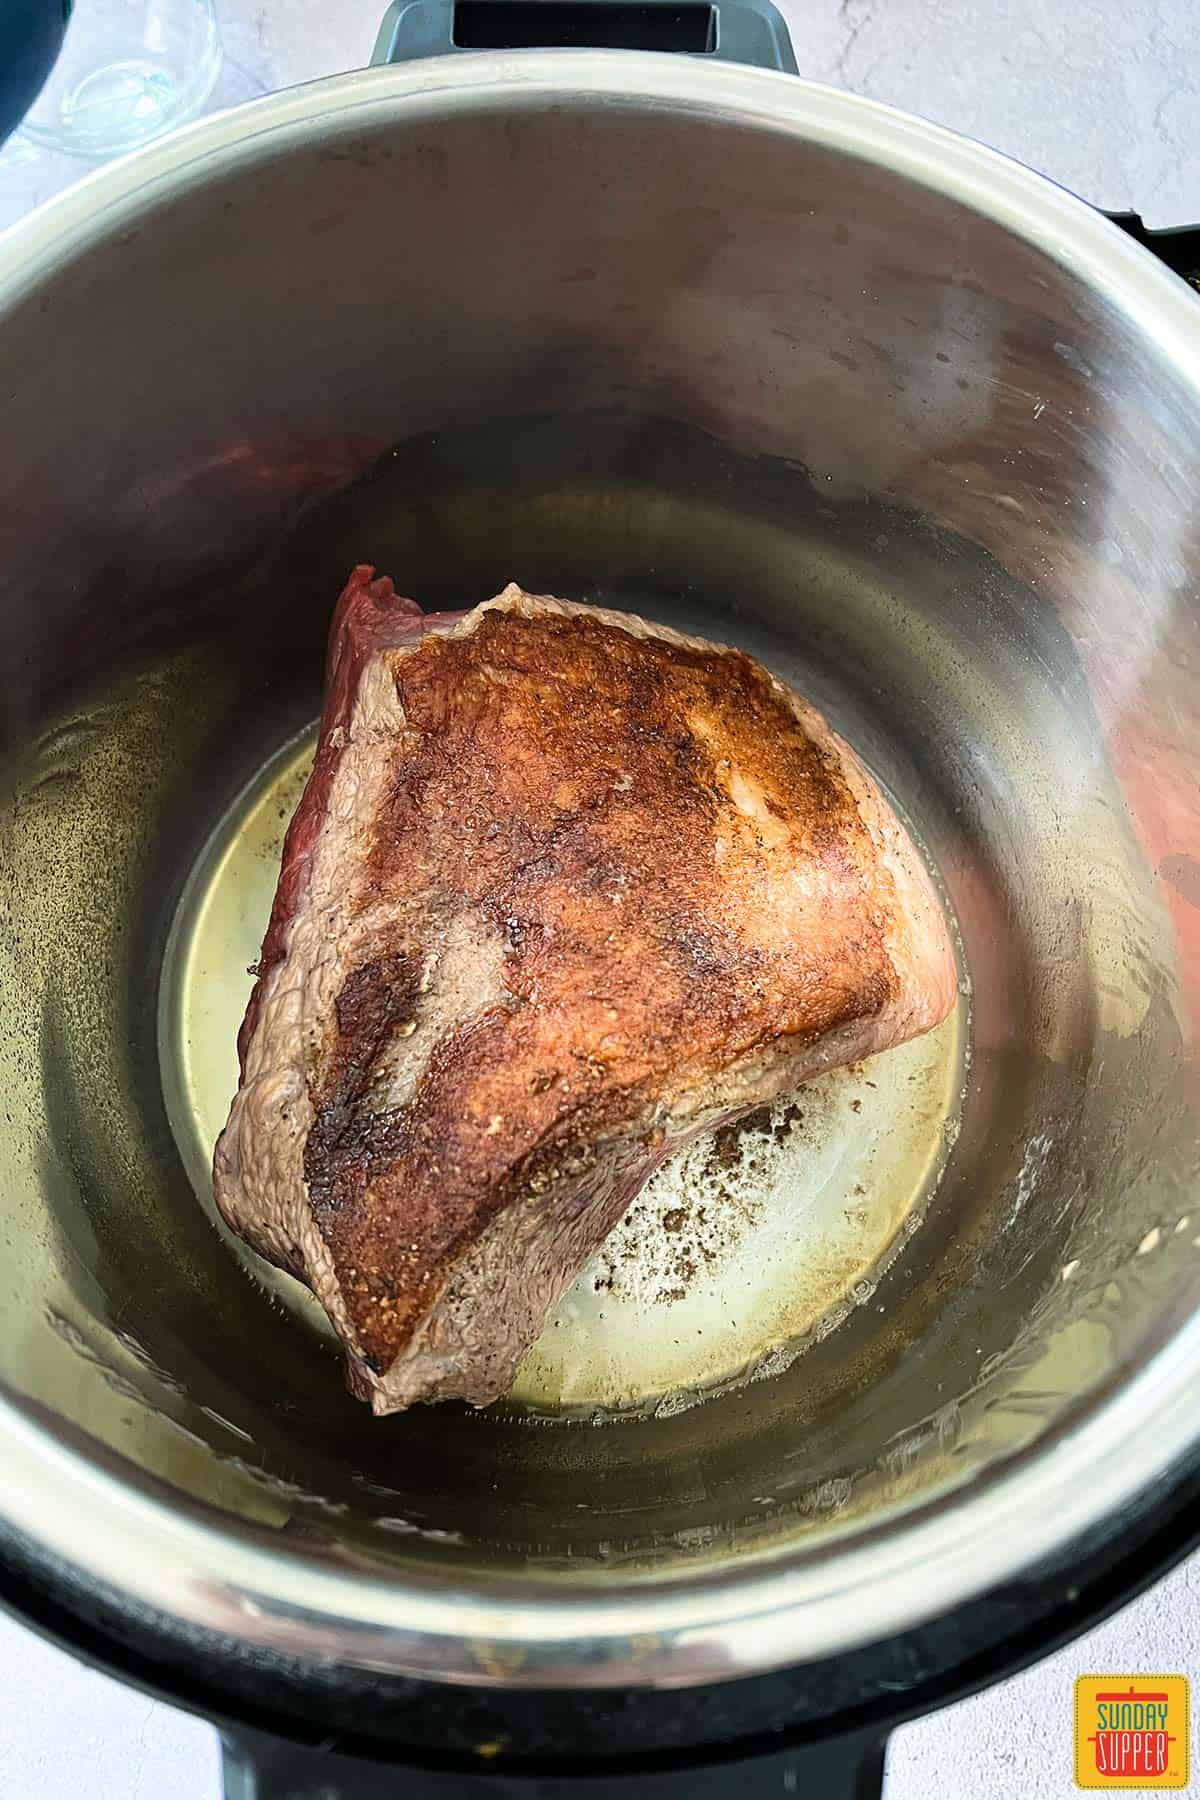
Sear for 4 minutes on the first side, then flip and sear the opposite side for 4 minutes. Remove roast and set aside.
Add the remaining vegetable oil to the pot, along with diced onions and minced garlic. Sauté for about 3-4 minutes, stirring frequently.
When soft and fragrant, add in red wine and sauté for 5 minutes, stirring frequently, until the wine reduces to half.
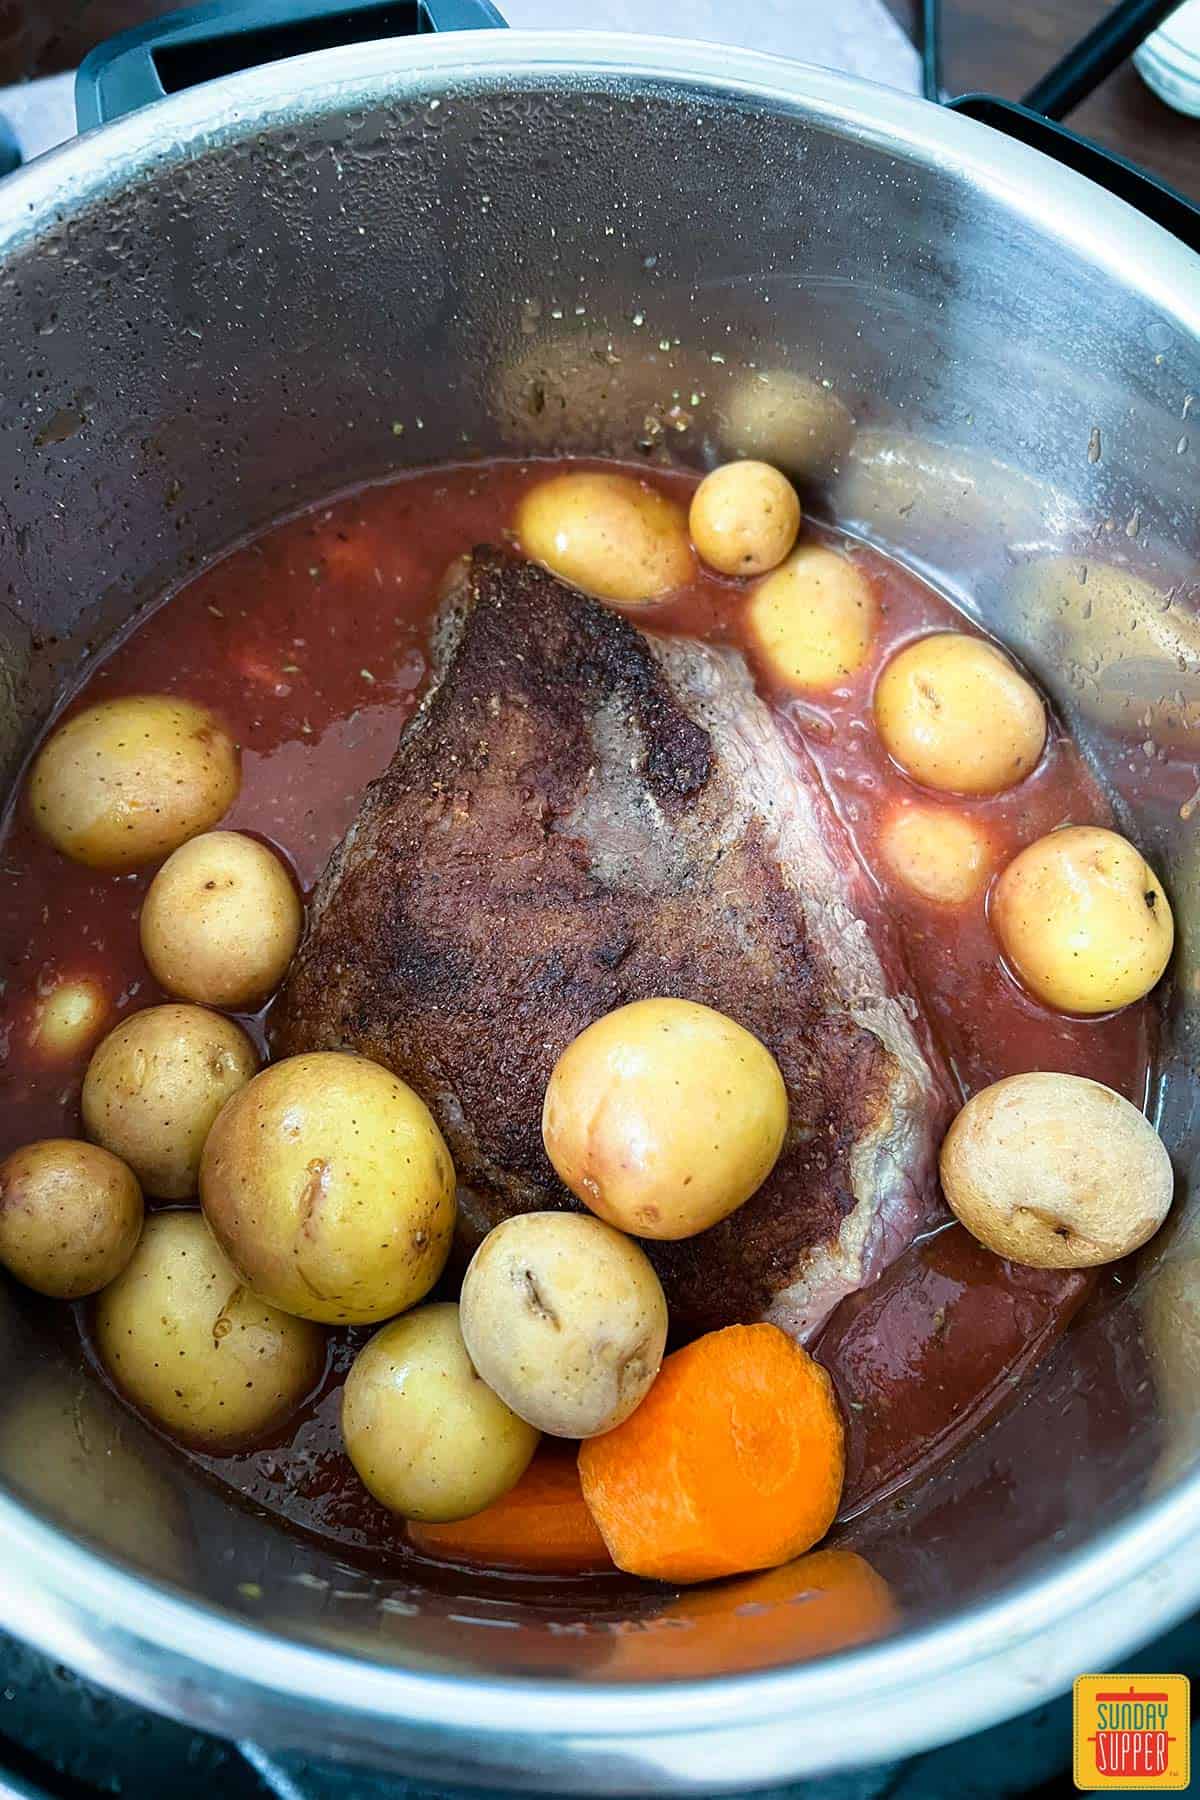
Add in half of your beef broth, tomato sauce, dried thyme, Italian seasoning, salt, and pepper, and give it a good mix. Carefully add your roast back into the pot along with carrots and potatoes.
Secure the Instant Pot lid and pressure cook on high for 70 minutes. Once 70 minutes is up, let your Instant Pot naturally release pressure for 20 minutes.
After 20 minutes, you can release any excess steam. Remove the meat from the pot and set it aside.
In a small bowl combine cornstarch and beef broth. Slowly add the mixture into the Instant Pot with the drippings from the beef. Stir until the mixture thickens.
Serve gravy over your pot roast, and enjoy!
Chuck Roast in the Instant Pot Tips
It’s important to let the pressure release naturally, so leave it for another 20 minutes after cooking.
Feel free to release the vent after 20 minutes. This will release any extra steam and allow you to open the lid.
Cutting the roast into halves helps cut down on the cooking time in the pressure cooker and allows you to distribute the seasoning more evenly, giving you a more flavorful dish.
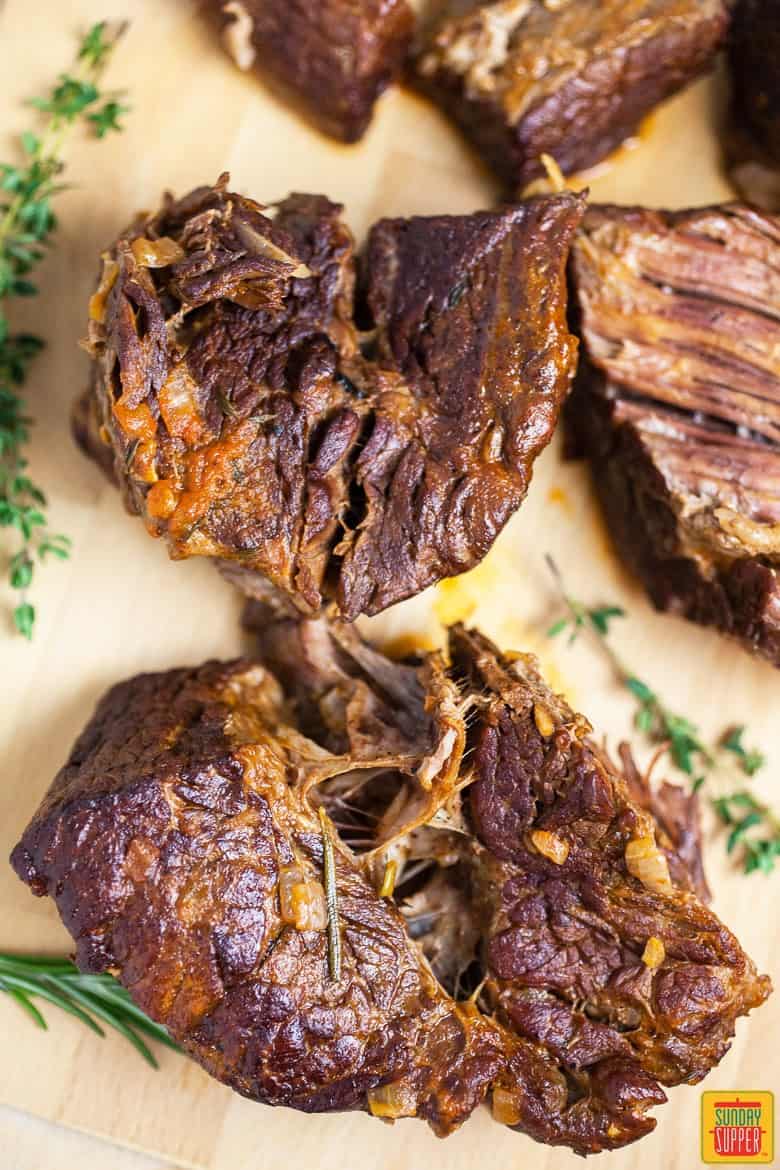
Cook roast beef in the Instant Pot at approximately 20 minutes per pound, until it is fall-apart tender and easy to shred with a fork. Adjust according to the size of your roast.
How do you thicken pot roast gravy in the instant pot?
You can thicken pot roast gravy in the Instant Pot by using a slurry. One of the best ways to thicken a sauce is to simply make a mixture of liquid and cornstarch, also known as a cornstarch slurry. You can do this with water and cornstarch or broth and cornstarch.
Skip the heavy dessert option for something that makes tastebuds twinkle! Learn about the 5 major types of dessert wine, from delicately fizzy Moscato d’Asti, to rich-and-brooding vintage Port.
Dessert wines are meant to be enjoyed in small glasses and treasured like a glass of Scotch.
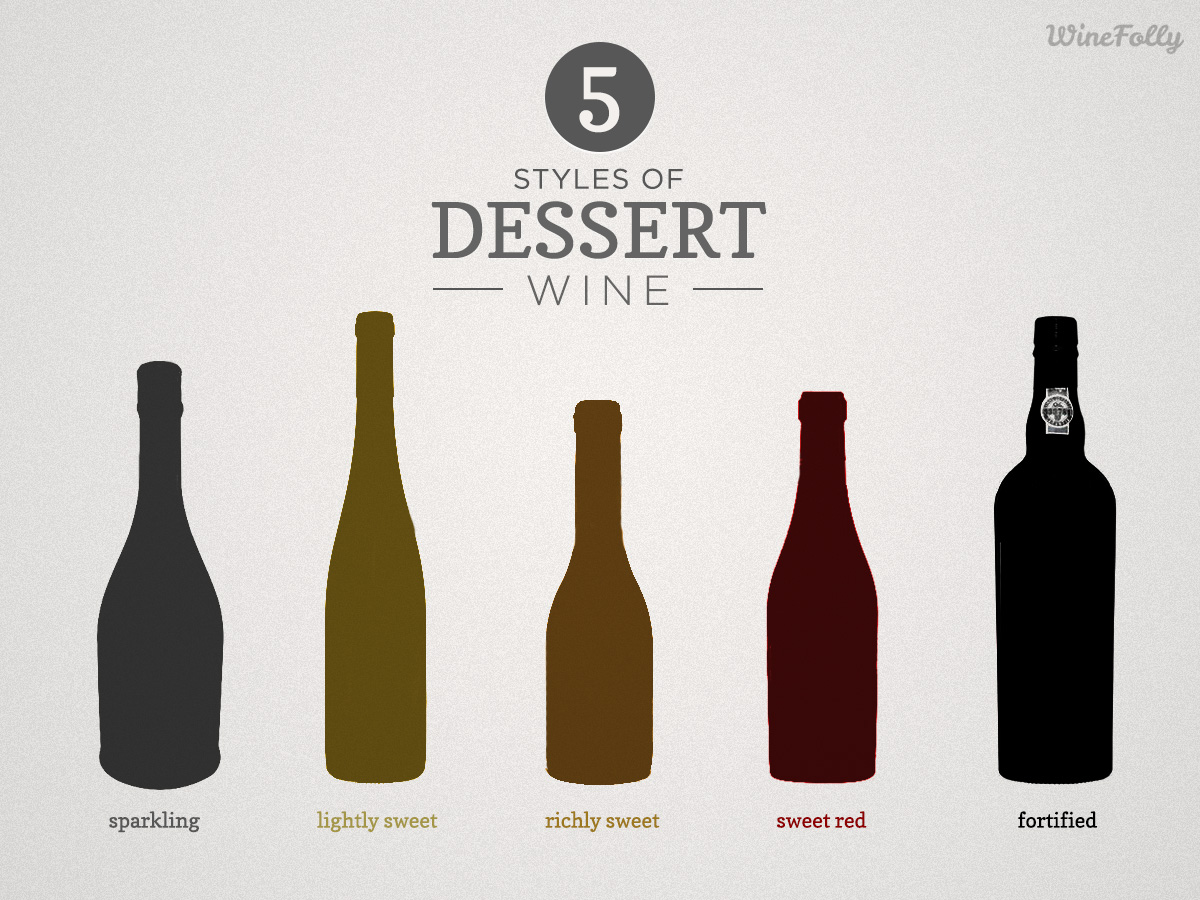
Most dessert wines can be categorized into 5 styles: Sparkling, Light & Sweet, Rich & Sweet, Sweet Red and Fortified.
Types of Dessert Wines
Sparkling Dessert Wine
Lightly Sweet Dessert Wine
Richly Sweet Dessert Wine
Sweet Red Wine
Fortified Wine
A Guide to Dessert Wines
Sweet wine comes from extra-sweet grapes! To make a sweet wine, the fermentation is stopped before the yeast converts all grape sugars into alcohol. There are several ways do stop fermentations, including super-cooling the wine or adding brandy to it. The result is a rich wine sweetened with natural grape sugars.
There are hundreds of different types of dessert wines available in the market, but most fall into 5 main styles. This guide outlines the 5 styles and includes examples of each. Explore all five styles for a deep dive into dessert wines.
Sparkling Dessert Wine
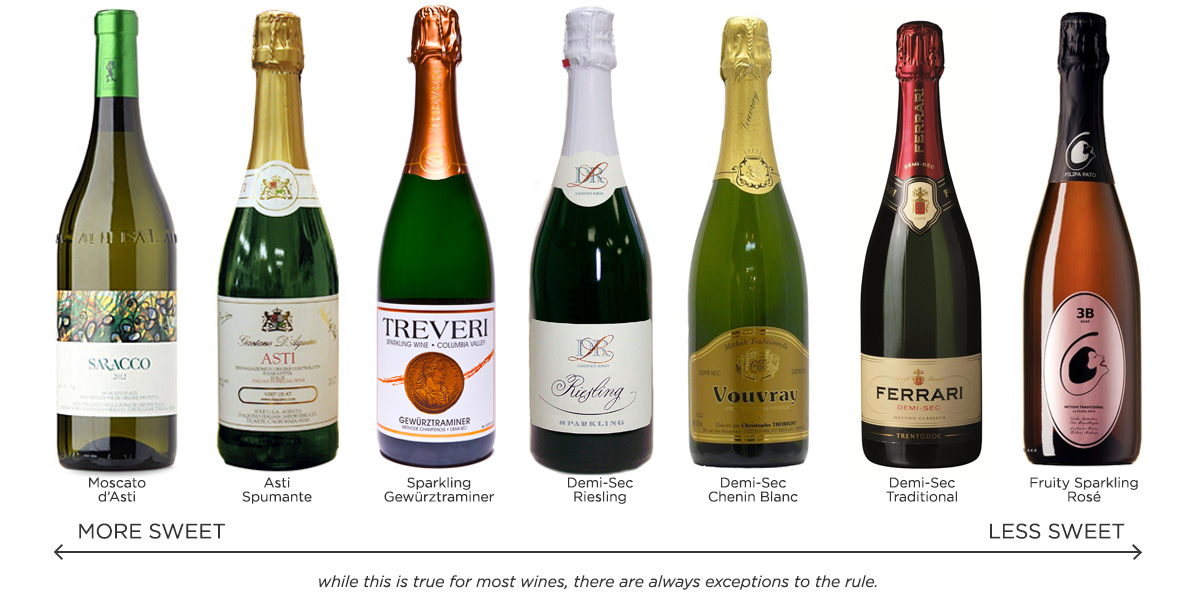
The carbonation and high acidity in sparkling wine makes it taste less sweet than is actually is! Certain grape varieties smell sweeter than others. This tricks our brain into thinking they taste sweeter too! For instance, a Demi-Sec (aka “Semi Secco”) Moscato tastes sweeter than a Demi-Sec Champagne even though both may have the same amount of sugar.
When looking for sweet dessert wine Champagnes and other sparklers, keep your eyes peeled for these words on the label:
Demi-Sec* (means “off-dry” in French)
Amabile (“slightly sweet” in Italian)
Semi Secco* (“off-dry” in Italian)
Doux (“sweet” in French)
Dolce / Dulce (“sweet” in Italian / Spanish)
Moelleux (“sweet” for some French wines)
*not to be confused with “Sec” or “Secco” which is the term for dry in French and Italian.
Lightly-Sweet Dessert Wine
Lightly sweet wines are refreshingly sweet; perfect for a warm afternoon. Many of these sweet wines pair well with spicy foods like Indian or Southeast Asian cuisine. Lightly-sweet wines are best enjoyed as close to the vintage date as possible, save for rare examples, like German Riesling, which age quite well!
Expect these wines to be exploding with fruit flavors and well suited for fruit-based and vanilla-driven desserts. For instance, consider Gewürztraminer: this wine is known for its lychee and rose petals aromas. A Gewürztraminer pairs excellently with fruit tarts.
Gewürztraminer A highly floral wine with moderate alcohol that’s commonly found in Alsace, Alto-Adige (Italy), California and New Zealand.
Riesling Available in both dry styles (common in Australia, Alsace and the US) as well as sweeter styles more commonly available from Germany. A wine with high natural acidity which helps cut the sweet taste.
Müller-Thurgau A less common variety also from Germany and found in parts of Oregon that has floral aromas with slightly lighter acidity. Classic porch wine and well-loved with sausages.
Chenin Blanc Chenin Blanc is commonly made in a sweeter style in the US and it’s also produced in large amounts in South Africa and the Loire Valley of France. Pay attention to labels when buying Chenin Blanc because many South African and French producers create dry versions that taste more like a dry Sauvignon Blanc.
Viognier Viognier for the most part, is not sweet. However, as an aromatic grape variety, occasionally you can find it in a fruit-driven style smelling of peaches and perfume. It’s rich and oily on the palate. This style of Viognier is found specifically from Condrieu AOP from the Rhône Valley) in France.
Richly Sweet Dessert Wine
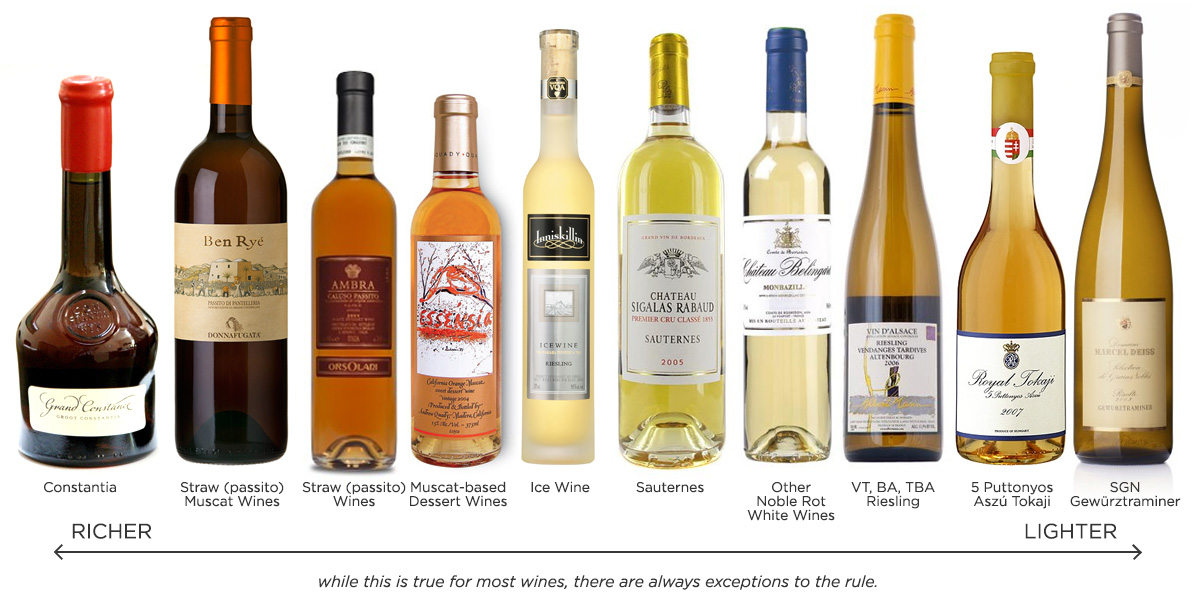
Richly sweet wines are made with the highest quality grapes in an unfortified style. Many of these wines can age 50+ years because sweetness and acidity preserve their fresh flavor. Some of these wines are historically important including Hungarian Tokaji (‘toe-kye’) which was loved by the Tzars of Russia; South African Constantia which was an obsession of the Dutch and English; and French Sauternes which was loved by Americans in the early 1800’s.
There are several ways to produce richly sweet dessert wines and you can understand them better by how they’re made.
Late Harvest
Late harvest means exactly what it’s called. As grapes hang on the vine longer in the season they become even sweeter and more raisinated, resulting in grapes with concentrated sweetness. In Alsace, late harvest is called “Vendage Tardive,” and in Germany it’s referred to as “Spätlese.”
Any grape left on the vine can be used for late harvest wines. That being said, it’s popular to find late-harvest wines using Chenin Blanc, Sémillon, and Riesling grapes.
Noble Rot
Noble rot is a type of spore called Botrytis cinerea that eats fruits and vegetables. While it sounds (and looks) disgusting, noble rot adds unique flavors of ginger, saffron, and honey to sweet wines. There are many popular types of dessert wines made from noble rot grapes.
Sauternais A group of French Appellations in and around Bordeaux including Sauternes, Barsac, Cadillac, and Monbazillac that use Sémillon and Sauvignon Blanc in a rich, golden-hued sweet wine.
Auslese, BA, and TBA Riesling (BA = Beerenauslese and TBA = Trockenbeerenauslese) In the German Pradikat system (a sweetness labeling system), Auslese is the first level with a higher proportion of botrytis-affected grapes. Besides being sweeter than “QbA” and “Kabinett” German Rieslings, they also typically feature higher alcohol.
Straw Mat
(aka “Passito”) Grapes are laid out on straw mats to raisinate prior to winemaking.
Italian Vin Santo is made with Trebbiano and Malvasia grapes and has rich nutty date-like flavors. There are several styles of Vin Santo made throughout Italy.
Italian Passito Another straw wine made with several different kinds of grapes, both white and red. For instance, Passito di Pantelleria is Muscat-based and Caluso Passito is made with the rare grape Erbaluce from Piedmont.
Greek Straw Wines Greece also produces Vinsanto, which is made with high-acid white Assyrtiko grapes; Samos is a sweet wine made from Muscat grapes; and Commandaria is a sweet wine from Cyprus that dates back to 800 B.C.E.
German Strohwein/Austrian Schilfwein Schilfweins are increasingly rare sweet wines made from Muscat and Zweigelt grapes in Austria and Germany.
French Vin de Paille Most notably from the Jura region of France, which is adjacent to the alps, these Vin de Paille are produced using Chardonnay and ancient Savagnin grapes.
Ice Wine (Eiswein)
True ice wine is extremely rare and expensive for two reasons. One, it only occurs in bizarre years when a vineyard freezes. And two, ice wine must be harvested and pressed while grapes are still frozen!
The largest ice wine producer in the world is Canada. You can find ice wines in cooler regions like Germany, Austria, and Switzerland.
Most ice wines are made with Riesling or Vidal grapes, although anything, even Cabernet Franc, can be used to produce an ice wine. You’ll find them to be honeyed and richly sweet, similar to a noble rot wine.
Sweet Red Wine
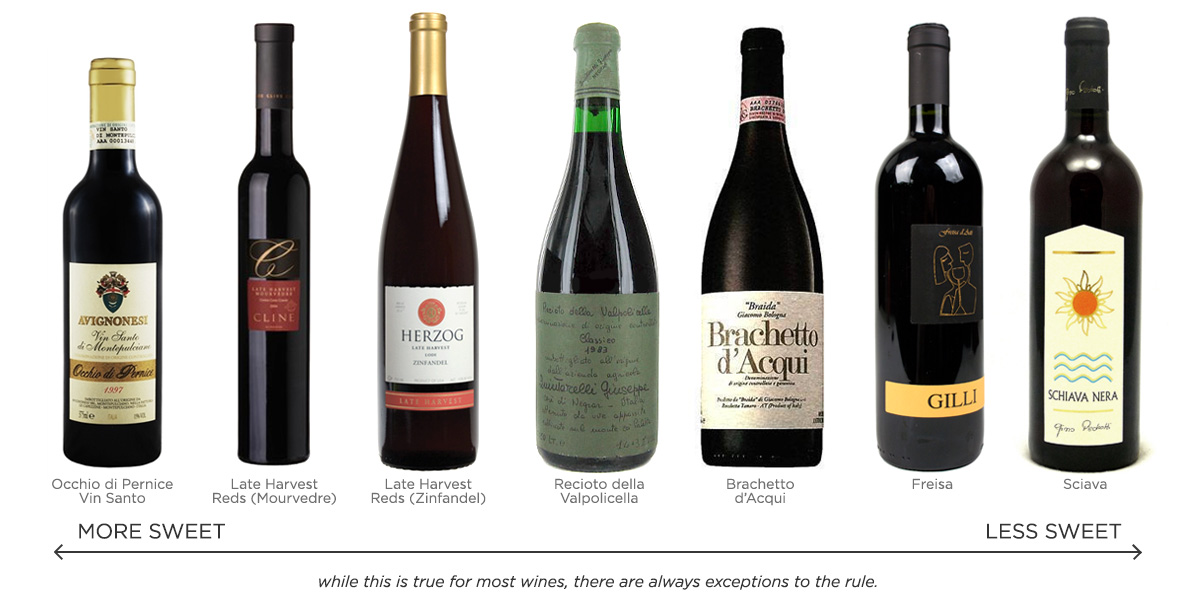
Sweet reds are on decline except for cheap commercial production. However, there are still a few well-made historically interesting sweet reds worth trying. The majority of these awesome sweet red wines are from Italy using esoteric grapes.
Lambrusco A region producing a refreshing bubbly wine in both dry and sweet styles. Since it’s a sparkling wine, it will have a yeasty undertone along with raspberry and blueberry flavors. Sweet versions are labeled as “Amabile” and “Dulce”.
Brachetto d’Acqui A still and bubbly red or rosé wine made with Brachetto grapes from the Piedmont region. Famous for its floral and strawberry aromas as well as its affinity to pairing with cured meats.
Schiava A rare variety from Alto-Adige that is nearly wiped off the map. Smelling sweetly of raspberry and cotton candy while being refreshing and only a touch sweet.
Freisa Once one of the great red varieties of Piedmont, Freisa is related to Nebbiolo with lighter tannins and floral cherry notes.
Recioto della Valpolicella Made in the same painstaking process as Amarone wine, Recioto della Valpolicella is lush, bold and rich.
Late-Harvest Red Wines There are many red dessert wines in the US made with grapes such as Zinfandel, Mourvedre, Malbec and Petite Sirah. These wines explode with sweetness and heightened alcohol content.
Fortified Wine
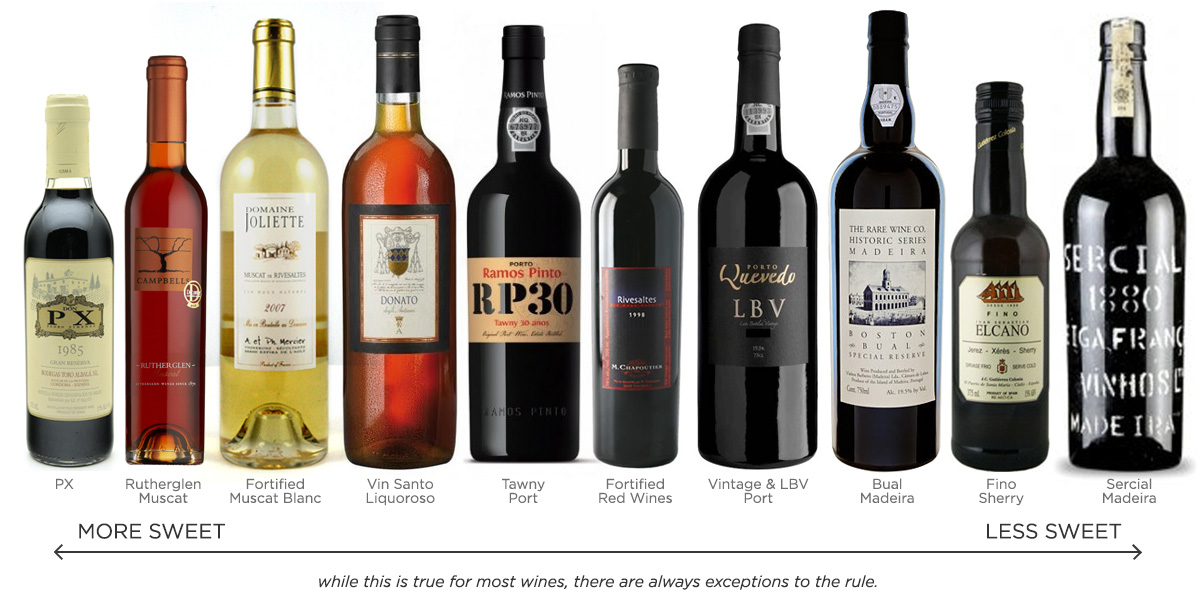
Fortified wines are made when grape brandy is added to a wine and can either be dry or sweet. Most fortified wines are higher in alcohol content (about 17-20% ABV) and have a longer shelf life after they are opened.
Port
>Port wine is made in the Northern part of Portugal along the Douro river. These rare sweet red wines are made with dozens of Portuguese traditional grapes including Touriga Nacional, Touriga Franca, and Tinta Roriz. The grapes are collected and fermented together in open tanks where the grapes are stomped daily as the wine begins to ferment.
At a point during the fermentation, the wine is strained and blended with a clear grape spirit (with nearly 70% ABV) that stops fermentation and fortifies the wine. After this process, there are a series of winemaking steps that lead into the different styles listed below.
Ruby & Crusted Port (sweet) This is an introductory style of Port wine that tastes of freshly minted port and is much less sweet than Tawny Port.
Vintage & LBV Port (sweet) LBV and Vintage Port are made in the same style but LBV are designed to be enjoyed in their youth (due to the style of cork enclosure) and vintage Ports are meant to be aged about 20-50 years before drinking.
Tawny Port (very sweet) The process of aging a Tawny Port happens at the winery in large wooden casks and smaller wooden barrels. The longer the Tawny Port ages, the more nutty and figgy it becomes. A 30-40 year Tawny is the best.
Port-Style Wines a.k.a. Vin Doux Naturel (sweet) Port can only be made in Portugal although many producers all over the world make port-style wines such as Zinfandel ‘Port’ or a Pinot Noir ‘Port’. We refer to these wines as vin doux naturel(see below).
Sherry
Sherry comes from Andalusia, Spain. The wines are made using Palomino, Pedro Ximénez (a grape, not a person), and Moscatel grapes. Wines are produced using varying amounts of the three grapes and are purposefully oxidized so that they develop nutty aromatics.
Fino (dry) The lightest and most dry of all the Sherries with tart and nutty flavors.
Manzanilla (dry) A specific style of Fino Sherry from a more specialized region that’s even lighter than Fino.
Palo Cortado (dry) A slightly richer style of sherry that is aged longer producing darker color and richer flavor. These wines are typically dry but will have fruit and nut aromas with salinity.
Amontillado (mostly dry) An aged sherry that takes on nutty flavors of peanuts and butter.
Oloroso (dry) A very aged and dark sherry that has higher alcohol content due to the evaporation of water as the wine ages. This is more like the scotch of Sherry.
Cream Sherry (sweet) A sweet style of Sherry made by blending Oloroso with Pedro Ximénez Sherry.
Moscatel (sweet) A sweet sherry with fig and date flavors.
Pedro Ximénez (PX) (very sweet) A very sweet sherry with brown sugar and figlike flavors.
Madeira
Madeira is a wine produced using up to 4 different grapes on the island in the middle of the Atlantic Ocean. Madeira is very unlike other wines because, in order to produce it, the wines undergo a heating and oxidation process – techniques that would traditionally “ruin” a wine.
The result is a rich fortified wine with walnut-like flavors, salinity and an oiliness on the palate. Because of the 4 different grapes used, Madeira range from dry to sweet making them work well alongside a meal or even as a pre-dinner drink. Learn more about Madeira here.
Rainwater & Madeira When the label just says “Madeira” or “Rainwater” assume that it’s a blend of all 4 grapes and somewhere in the middle in terms of sweetness.
Sercial (dry) Sercial is the driest and the lightest of all the grapes in Madeira. These wines will have higher acidity and be dry with notes of peaches and apricot. It’s not too uncommon to see Sercial Madeira aged for 100 years.
Verdelho (dry) Verdelho has citrus notes and will develop nutty flavors of almond and walnut with time.
Bual (sweet) Bual leans on the sweet side with notes of burnt caramel, brown sugar, fig, rootbeer and black walnut. It’s common to find 10 year old ‘medium’ (meaning: medium sweet) Bual Madeira although there are several well aged 50-70 year old Bual as well.
Malmsey (sweet) Malmsey Madeiras have orange citrus notes and caramel to their taste along with the oily oxidized nutty flavor.
Vin Doux Naturel (VDN)
Vin Doux Naturel are made in a similar style to Port where a base wine is created and finished with neutral grape brandy. The term vin doux naturel comes from France, but this classification could be used to describe a wine from anywhere.
Grenache-based VDN Typically from the south of France, such as Maury, Rasteau and Banyuls from Languedoc-Roussillon
Muscat-based VDN Muscat de Rivesaltes, Muscat de Frotignan, Muscat de Beaumes de Venise, Ruthernglen Muscat (Australia), Orange Muscat and Vin Santo Liquoroso (Italy).
Malvasia-based VDN Mostly from Italy and Sicily such as Malvasia delle Lipari Liquoroso
Mavrodaphni From Greece, Mavrodaphni is a sweet red wine with many similarities to Port.
:max_bytes(150000):strip_icc()/102328482_preview-2000-3e55a5cf5013436083dc80b79883a93b.jpg)
:max_bytes(150000):strip_icc()/CD_26900_preview-9048c22930db4831bcfebce17e6151ce.jpg)